|
| |
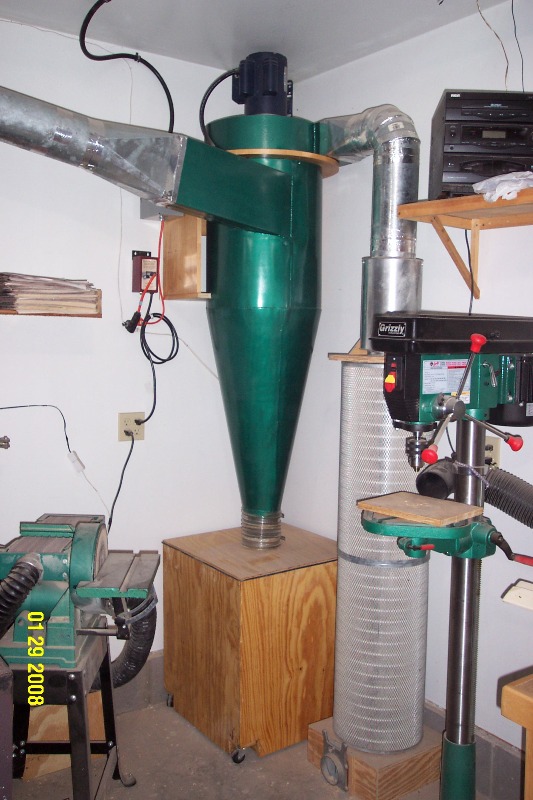
Today with the knowledge that we have on the hazards of wood dust, making
sure you have good dust collection and filtration down to the submicron is very
important. The stock bags on most DCs are 30 micron, which means they are just chip
collectors, and actually pump the most harmful dust back into our shops.
To accomplish the submicron filtration we need, a cyclone is really
needed.
Bill Pentz has researched cyclones a lot lately, and has posted what he has
learned for all of us here.
And my cyclone from his plans is
here.
I did some research on the Internet and found an Excel
spreadsheet that calculated the performance and efficiency of a cyclone, given
the dimensions. I found it enlightening to see how the different
dimensions interact to get the desired performances.
Research on filters for the cyclone has produced several options. The
choices all come down to two major choices. Filter bags or cartridge
filters.
Some of the sources of cartridge filters suitable for cyclones are:
Sources of bag filters: Make sure you have at least 1 sqft of surface
area for every 10 CFM your system provides.
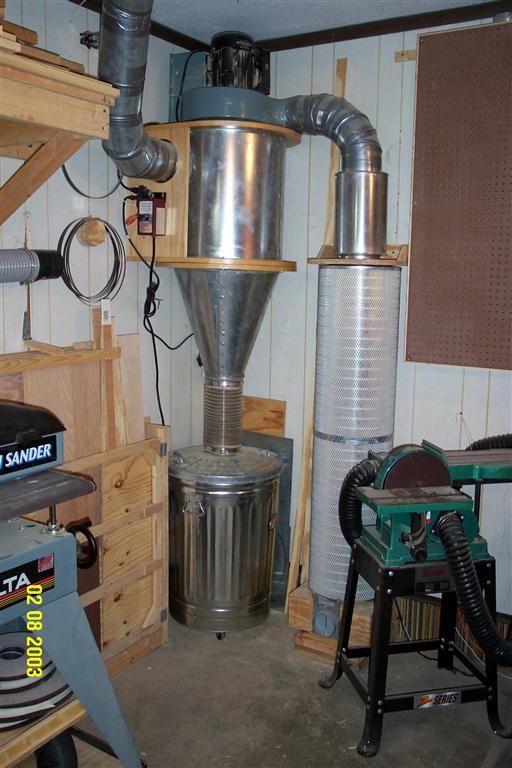
For the building of my first cyclone I downloaded the plans for the Wood Magazine
cyclone,
I built the cyclone with the dimensions for the 550-800 CFM unit. I
figured that manufacturers state the maximum power of their blowers, with no
restrictions and in a full system I would have around 750 CFM
going in the cyclone.
I did a few modifications to the plan from Wood magazine.
1. I used 26 gauge sheet metal in the construction.
The plans call for a 760 CFM blower, and I was going to use my 1200 CFM
blower. I read about the problems that another forum member had using the 30 gauge sheet metal the plans call for with his
1250 CFM blower, so I just opted for the heavier constriction. |
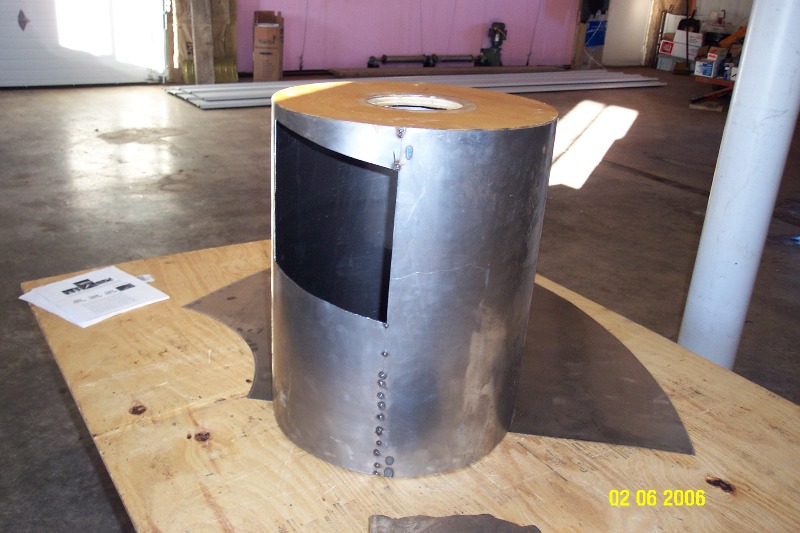
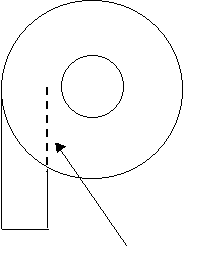
2. Installed a neutral vane. This picture should
give a good illustration of what I mean. This view is from
above. The center circle is the exhaust of the cyclone and the
rectangle on the edge is the inlet. The neutral vane is the
extension of the input pipe to the center line of the
cyclone (the dashed line). This
modification reduces the static pressure drop associated with cyclones and
in turn increases the CFM the cyclone delivers. I
actually installed the neutral vane after the cyclone was built. I installed the neutral vane by removing the inlet and then inserting the pipe to the centerline and attaching it. Now this method does not allow you to tune the neutral vane, but was the most elegant way to install it for me, also much easier than the installation of the inlet by the plans. One other way is to insert the pipe inside the existing inlet and slide it in and out until you get the greatest amp draw on the blower you can. I tried this (except for checking the amp draw (didn't have an amp meter)) but didn't have much success getting the 6" snaplock inside the 6" snaplock. Tried cutting off the snap, then it just wouldn't stay together.
The more amps the more air flow. |
 |
|
3. I increased the intake to the blower from the
4" the plans call for to the 6" intake my blower has. |
4. Used filter bags instead of the cartridge filter.
Would probably change this if I did it again. Update:
I have
replaced the filter bags with cartridge filters to upgrade the filtering and regain precious floor space. |
|
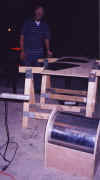
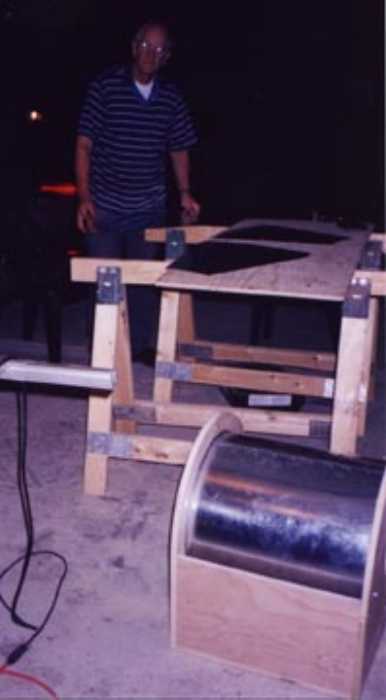
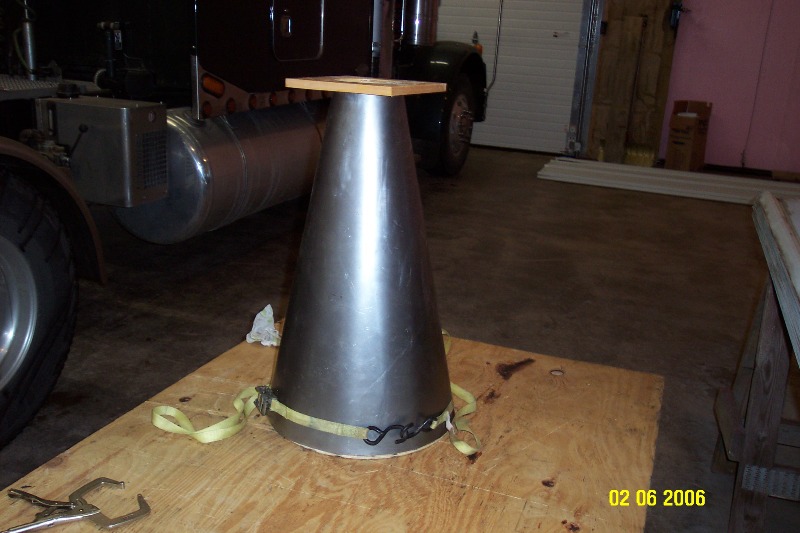
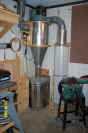
Here
is a picture of the construction. It took one long day to build the major
pieces, and a second day to varnish the birch plywood it is built out of, but I
thankfully had help. That is a friend of mine in the picture.
We had used heavy-duty paper to mockup the cyclone before construction,
and had no problems with the actual construction.
|
|
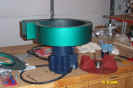
I removed the wye at the blower, and to my
surprise there was a restriction that reduced the 6" input down to a
4" input to the blower. I removed that with a hammer and chisel.
I checked the amp draw of the motor to make sure it was within tolerances, and
it was fine.
I put some weather stripping around the 6" flange on the blower inlet
and set the blower on top of the cyclone. I do not have anything holding
the blower to the cyclone except for gravity.
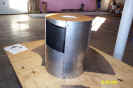
I installed weather stripping on the trash can lid to seal it, and had to
silicone the seal in place. So much suction would force the weather
stripping to just slide on the lid.
|
|
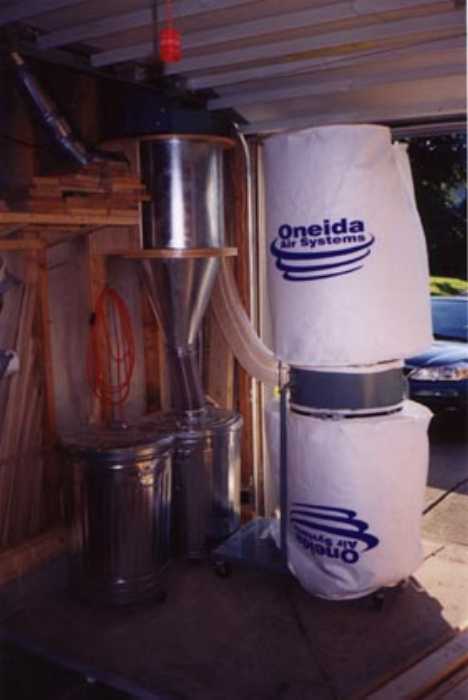
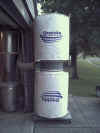
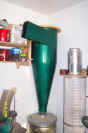
 Finally,
I ordered replacement filter bags from Oneida Air. The reason the lettering is upside down on the lower one is because I used two of the upper bags instead of using one of each, upper and lower bags. The upper bag is 6" taller than the available bag for the lower one.
I wanted as much surface area as possible.
I have approximately 62 sqft of surface area in this setup, which should be close
to the 1 sqft to 10 CFM requirement for good filtration. In this picture you can see how the bags looked before I made some modifications to the supports. Finally,
I ordered replacement filter bags from Oneida Air. The reason the lettering is upside down on the lower one is because I used two of the upper bags instead of using one of each, upper and lower bags. The upper bag is 6" taller than the available bag for the lower one.
I wanted as much surface area as possible.
I have approximately 62 sqft of surface area in this setup, which should be close
to the 1 sqft to 10 CFM requirement for good filtration. In this picture you can see how the bags looked before I made some modifications to the supports.
|
|
If
you look closely in this picture you can see the extensions to the legs, both vertically and in circumference, that I installed. I also installed two hangers for the upper
bag instead of just the one, because these bags have two loops to hang them on the outside edges.
|
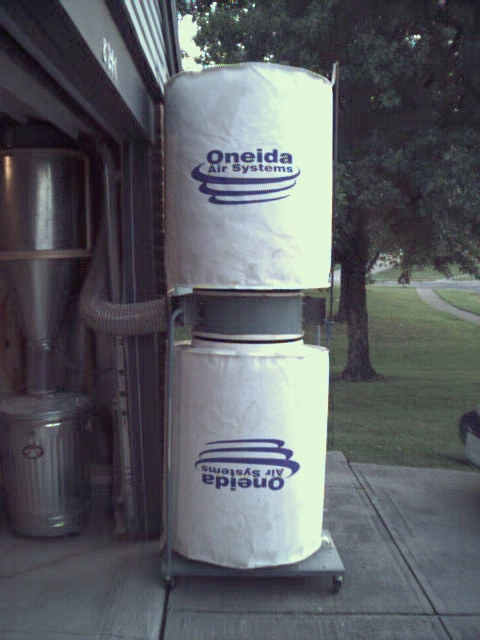
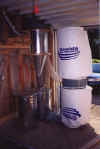
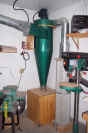
 Having
the felt bags was a great improvement in filtration over the stock bags
that came with the dust collector. Here the cyclone was first
installed in my Oklahoma City shop. Having
the felt bags was a great improvement in filtration over the stock bags
that came with the dust collector. Here the cyclone was first
installed in my Oklahoma City shop. |
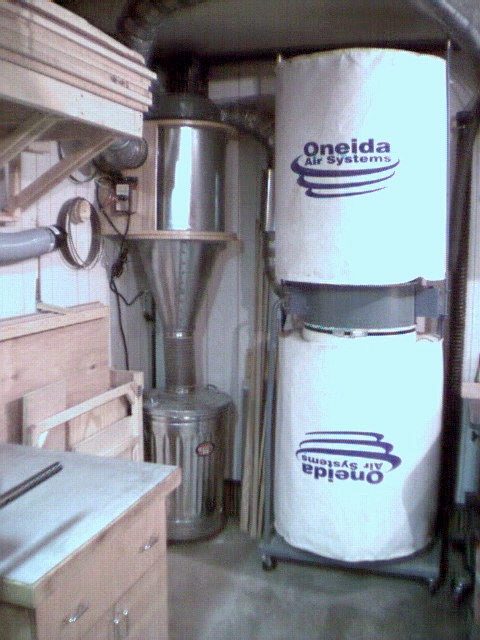
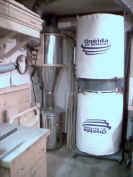
 I have replaced the filter bags with 0.2 micron Torit
cartridge filters from Wynn
Environmental.
The base and the top mount I built from these plans
I got from Saws N' Dust. In addition to the finer filtering size, I have
recouped 8 sqft of precious floor space. I have replaced the filter bags with 0.2 micron Torit
cartridge filters from Wynn
Environmental.
The base and the top mount I built from these plans
I got from Saws N' Dust. In addition to the finer filtering size, I have
recouped 8 sqft of precious floor space. In this system, I have 1 - 5" drop and
9 - 4" drops to
various tools throughout the shop. I have added the Oneida 6"
silencer to the exhaust and it is a little quieter. |
|

New Cyclone
|
| After I separated from the military I moved to Northern Minnesota
and I bought my first house. I found a house that had a
26x32 garage with it. This time I needed a bigger system to get all the
dust. I built a new cyclone based on Bill
Pentz design, and layed out new ductwork. I now have 1-6",
5-5" and 7-4" drops in the shop. |
  For
my new system I chose to build a Bill Pentz style cyclone.
It is constructed out of 20 Ga steel, and Mig welded together. For
my new system I chose to build a Bill Pentz style cyclone.
It is constructed out of 20 Ga steel, and Mig welded together. |
 I also am
building a new blower to power the cyclone with a 5 hp motor and 14"
fan. I also am
building a new blower to power the cyclone with a 5 hp motor and 14"
fan. |
  I
have the cyclone installed. The Pentz style cyclone is much taller
than what I had before. I had to remove the wheels off the 30 gallon
trash cans I use for the dust bins so it fits in the shop, and I have
8'8" ceilings. Now I have to get the blower on top of the
cyclone. I built a new dust bin, a plywood box 2'x2'x30" high, which
is 50 gallons. I
have the cyclone installed. The Pentz style cyclone is much taller
than what I had before. I had to remove the wheels off the 30 gallon
trash cans I use for the dust bins so it fits in the shop, and I have
8'8" ceilings. Now I have to get the blower on top of the
cyclone. I built a new dust bin, a plywood box 2'x2'x30" high, which
is 50 gallons. |
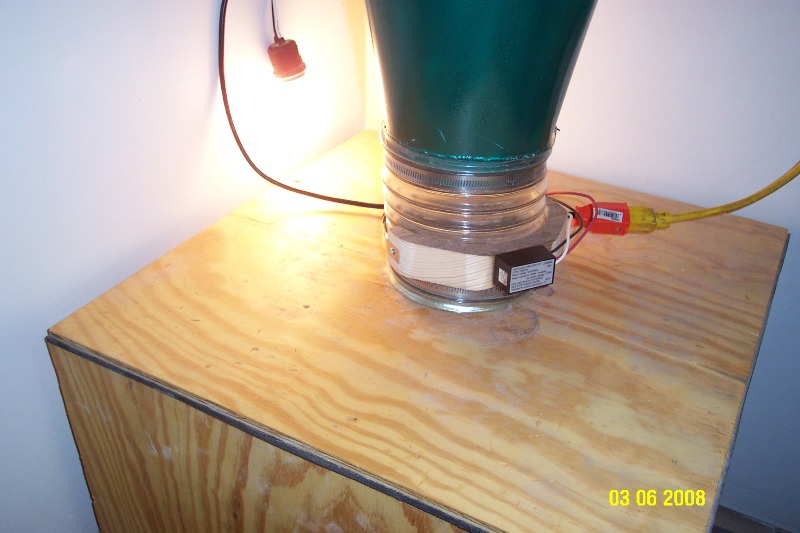
My dust bin full sensor
Copied from the plans by Alan Schaffter.
|

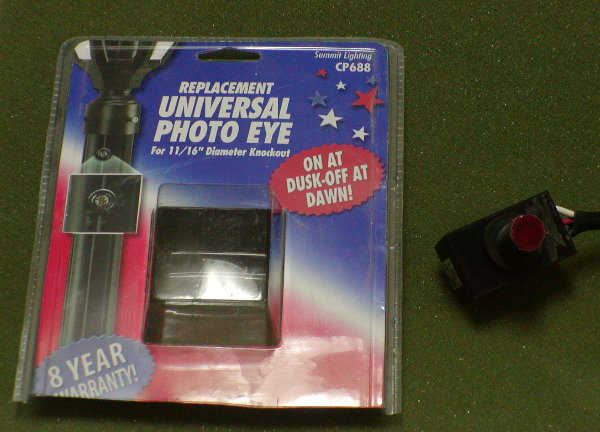 For
the sensor I am using a standard lamp post replacement dusk-dawn electric
eye by Summit Lighting CP688 photoeye (Lowes part #70551) I got for less
than $10. It operates on 110V and turns on (provides a 110V output) when
the sensor is no longer sufficiently illuminated (dusk). I have tried
other photoeyes, but they seem to have a delay built in, and for this
application that didn't work.
For
the sensor I am using a standard lamp post replacement dusk-dawn electric
eye by Summit Lighting CP688 photoeye (Lowes part #70551) I got for less
than $10. It operates on 110V and turns on (provides a 110V output) when
the sensor is no longer sufficiently illuminated (dusk). I have tried
other photoeyes, but they seem to have a delay built in, and for this
application that didn't work.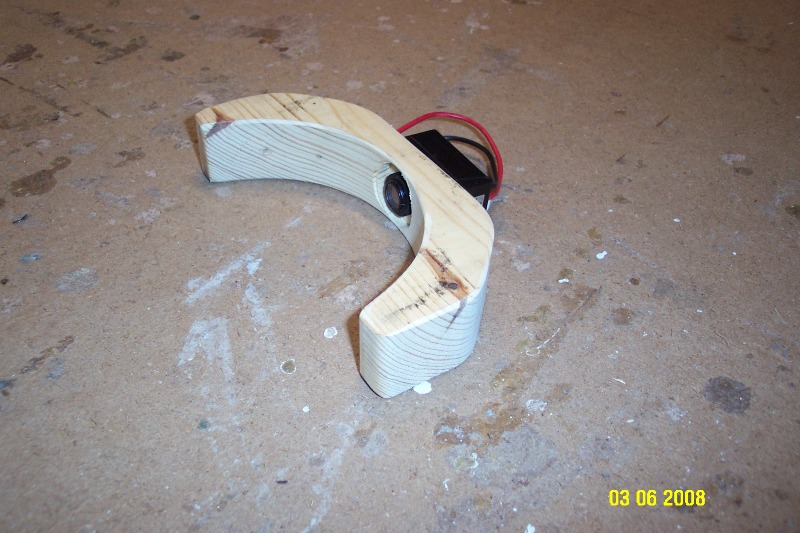 I
took a piece of 2x4 and cut a curve in it to conform to the flex between
the cyclone and dust bin. Drilled a hole in the center of the board and
attached the sensor through the board. I cut a 6" hose clap in half
and attached it to the board and clamped that onto the flex.
I
took a piece of 2x4 and cut a curve in it to conform to the flex between
the cyclone and dust bin. Drilled a hole in the center of the board and
attached the sensor through the board. I cut a 6" hose clap in half
and attached it to the board and clamped that onto the flex.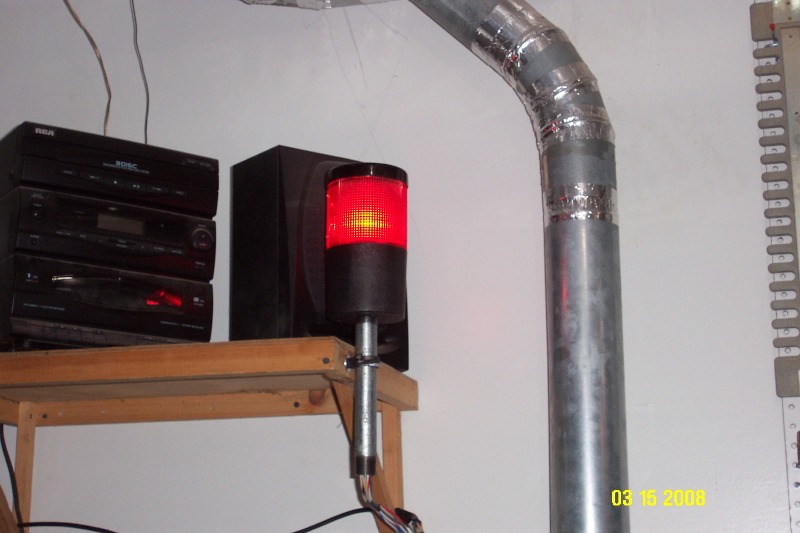 I bought a strobe on Ebay for $45 that I plug the output of
the sensor into. So when the dust bin get full and the dust starts filling
the flex the dust will block the light and the sensor will power the
strobe.
I bought a strobe on Ebay for $45 that I plug the output of
the sensor into. So when the dust bin get full and the dust starts filling
the flex the dust will block the light and the sensor will power the
strobe.